Pages

Sunday, June 30, 2013

Color Me Rad!

I am so proud of Cody & I!! Today we ran in our first 5K called Color Me Rad! We showed up bright and early sporting our RAD attire!

Team "MoHawk" was ready to go! I am so happy our dear friends were willing to join us for this experience!
We waited at the start line where the Wounded Warriors started off the race first. In the mean time, we started getting colored RAD! (thanks Cody for the bunny ears...classic)
Although it is a novelty run and they don't even time it... we seriously ran it! IN THE MIDDLE OF A THUNDERSTORM as a matter of fact! As soon as we started the race a thunderstorm came out of no where and we got DRENCHED! Our shoes were 5 pounds heavier, we couldn't see out of our glasses, the RAD chalk turned into more of a paint ... but it was AWESOME!
Cody gave me a hard time before hand asking me what we were going to bet on for who would win the race. Obviously, he thought he had a chance to beat me. He was wrong! Which is why I am already done and standing at the finish line taking his picture :) Love you Cody - awesome job!
 Here is our after photo! I timed my run at 26:20, which would be my fastest time. I was in the first group of people to cross the finish line but since they don't time it, I don't know where I placed. (yes, those are real thunderstorm clouds above us!)
Team MoHawk - Totally RAD!
We had such a great time and are already trying to find more races to run in!!


Friday, June 28, 2013

Watermelon Waffles

Today we are learning about watermelons as part of our Summer Treats lesson and what better way to start off the day than with watermelon waffles?!

They are super easy to do and we had everything already without having to shop for it. Sorry, these pictures aren't the best but we had 3 hungry little girls who struggle with patience when I'm photographing their food ;)

You will need:
Any waffle batter
red or pink food coloring
green food coloring
chocolate chips (we used mini ones)

To make:
1. Prepare the waffle batter then pour 1/3 of it into a separate bowl.
2. Add the green food coloring to the smaller 1/3 portion and mix well.
3. Add red or pink food coloring to the remaining batter and mix well.
4. Once your waffle iron is hot, coat with Pam
5. Start by pouring the red/pink batter into the center of the waffle iron and letting it spread out but leaving enough of a outside ring for the green batter
6. Pour the green batter along the outside ring.
7. Sprinkle desired amount of chocolate chips on top of the pink batter
8. Cook until your waffle is done!
This was just a quick test shot to test my exposure but I like how it shows the steam!
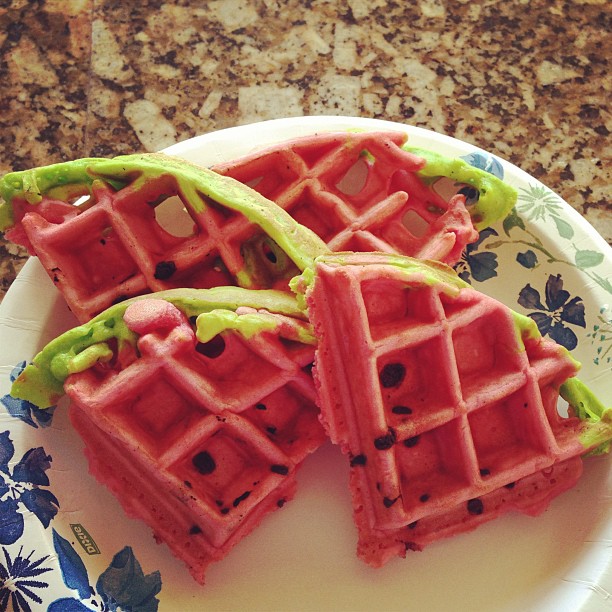
Ta-Da! Watermelon Waffles!!
Cut into fourths for watermelon wedges!!
kid waffles
This was picture of the 1st batch. The other waffles had more of a green edge once we got the hang of it. 
The girls loved these! Reese was being silly and eating it just like a watermelon. She said she wasn't going to eat the "green part" (since you don't get the rind) but she was just joking and ended up eating 2 whole wedges!

Serve with butter and syrup (my girls don't like syrup) or even with cool whip!

I even had a recommendation to freeze them for later (although I have not tried that).


Wednesday, June 26, 2013

Scarlett Kate is 18 Months!

Hello? Can you guess who is 18 months old today?!
I can't believe it!! The time seems to fly by even faster with each child. I wish I could just hit "pause" for a bit and soak it all in!
She looks so grown up here!
Eating:
This child is ADDICTED to cereal! She asks for cereal at least 3 times a day. She will go into the pantry and grab a box of cereal and a bowl and bring it to you to pour. Or... if you take to long to help her, she will just do it herself!
She LOVES to eat...all the time! One morning she ate 5 mini pancakes, my Greek yogurt, and cereal with milk and was still asking for "more"! She is always the first one to finish her meal and does a very good job at eating her meat, veggies, & fruit!
Sour Cream Body Painting is Fun!
Sleeping:
A few days past her turning 17 months we converted her crib to a toddler bed! She LOVES it and does PERFECT! She never gets out on her own (none of my girls do) and I believe it is from the early switching before they learn how to climb out of the cribs. She now goes to bed at 8pm and sleeps until 6:30ish. I really wish she would sleep in longer!!!

Paci:
Scarlett has been paci free for almost a month now! We had to drop it right after converting her bed because she had bitten through the nipple of it. I just tore the nipple off and showed her it was broken and said it was trash. No paci? No problem! She was the easiest of all of my girls to drop it! She only used it for sleep and it never ever left her bed.

Talking:
Holy vocabulary!!! This child is talking the most out of any of our girls for the age. She started talking a lot around 17 months (I remember Reese starting around 18 months and Emma even later).

She can now say...
"No" (a little to well)
"Wa, Wa" (water which is also synonymous with milk)
"Baby"
"Potty"
"Trash"
"Open"
"Shoes"
"Yay!"
"Pretty"
"Me"
"Boo"
"Purple"
"Wash"
"Up"
"I want down"
"1, 2, 3"
"Ewww"
"Hello/Bye"
"Thank you"
"Oh Toodles!" (thanks to Mickey Mouse)
"Tickle, Tickle"
"I did it!"
"Ready? Go!" (as in Ready, Set, Go)
"Run, Run"
"Excuse you"
"Where's Dada/Emma/Reese?"
"Bailey/Harley, where are you?"
"I want a cookie" (Cody swears she said this to him although I haven't heard it)

She has learned how to come ask me for "help" although she can't actually say it. But at least she isn't just screaming when she's frustrated now. She will walk up to me, start mumbling, and point. This is her way of asking for help. I've been trying to get her to say it each time.

Personality:
Get this...Scarlett has learned to blame her toots on Daddy! When she toots she will exclaim "Daddy?!" I don't know how in the world she learned this but it is hysterical!!
Scarlett is by far the funniest and most laid back child! She is always happy (as long as she has access to food)!
Yes, that's a bowl of cereal!
Motor Skills:
Scarlett has been eating (successfully) with forks and spoons for a long time now. She is a pro at going up the stairs and is learning how to go down (which makes me nervous). At 17 months, Scarlett learned how to swing like a BIG girl and she loves it!

Scarlett, 

      You are our little "firecracker"! You are so full of spirit and absolutely love life! You are also our "Wreck It Ralph" because you seek to make a mess of everything! You never let Mommy keep anything clean. If the art table is picked up and organized, you will pull all the buckets of crayons/markers down. If the dress up box is all packed up, you will pull every single dress/bracelet/shoes out! If Reese is coloring a picture, you will walk up and scribble all over it! (You did say you were sorry to Reese for that one).

      You keep us on our toes and never cease to make us smile! We know you are very smart and we are so proud of you! Thank you for showing us how to enjoy the moment!

                                                                                                                                     Love,
                                                                                                                           Mommy & Daddy


How To & How NOT To Build A Framed Magnetic Chalkboard {Tutorial}

We absolutely LOVE our magnetic chalkboard now that is is complete but let me tell you...we had know clue what we were doing and mistakes were made. I will try my best to walk you through the process, including what we did wrong. 

DO measure your area and decide on a size of framed chalkboard. Once you decide on your frame you can subtract the width of the frame out from your total size and then get sheet metal cut to size. We had to go to a metal warehouse to find sheet metal this big but it was super cheap and cut to the right size!

DO prop your sheet metal up on a work table so that you can easily reach and paint it
DO buy material to frame your chalkboard with (sheet metal is sharp and you don't want it exposed)
We bought a package of interlocking siding since our plan was to "slip" the chalkboard edges into the siding groves (more on this later)

DO recruit your husband to measure and cut perfect angles for your frame
DO assemble 2 sides of the frame together to make a fixed corner
Liquid Nails for Wood

Securing with wood jointers

Use wood filler to fix any gaps in the corner on the visible side of the frame
DO paint all the pieces of your frame (we decided to use our baseboard enamel)

DO take a piece of course steel wool and rough up the surface of the sheet metal to allow the chalkboard paint to stick
DO buy quality chalkboard paint and a smooth surface roller
DO paint your sheet metal with the chalkboard paint (try and roll in the same direction)

After 1 coat

After 4 or 5 coats (I lost count...remember it fell and got scratched)
DO take a piece of fine steel wool and gently rub the surface of the chalkboard paint once it is dry. This helps get the roller marks out and also helps the chalk to stick better (sorry, no picture of this)

DO prime your chalkboard with a piece of chalk laying on it's side

Rub the entire board in chalk

Take a wet washcloth and wipe off all the chalk

A clean & primed chalkboard
DO buy a mount big enough to hold the weight of your sheet metal
Mount still packaged shown on top of unpainted sheet metal
DO screw the wall mount into the wall making sure you hit the studs (we used painters tape to map out the spot)

DO NOT secure the other 1/2 of the mount to the back of the chalkboard with liquid nails!

DO NOT try to hang with the mount glued to back of chalkboard
DO NOT try and "slip on" the frame while hanging. 5 Minutes after this... it came crashing down! (tearing a big hole in the side wall and scratching up the chalkboard paint)
*The glue on the back of the chalkboard could not hold with the slight bending the metal does when trying to lift it up onto the wall and with all the manipulation of getting the frame on.

DO secure the chalkboard to a larger piece of wood with a bunch of liquid nails (we got used the measurement of what the chalkboard would be framed for our piece of wood)
The wood acts as a support and prevents the metal from any bending
DO paint the exposed edges of the wood to match your frame color
DO glue your frame onto the exposed wood while it is still laying down - it is now merely cosmetic (sorry no pic of this)

DO screw the other 1/2 of the mount into the back of this supporting wood (again no pic)

DO hang your framed (& secured) magnetic chalkboard once all your glue has set (I did put some basic Command Strips under the bottom 2 corners so it wouldn't bounce off the wall any)
Completely secured Giant Magnetic Chalkboard (we even banged on the walls to test it out!)
You may notice I distressed the frame and this was not my intention. My enamel paint "bubbled" really bad despite a new enamel brush, sanding the wood and cleaning it off well. So I needed a new plan. I had never distressed before. I wanted the darker color to show through but I had already painted the frame white. So... I took a piece of fine sandpaper and lightly sanded out the bubbles and then got a heavier sandpaper and scuffed off some of the white paint on the ribbed design of the wood. Then I cheated (although no one can tell)! I took a stain pen (that I had for my daughter's crib) and rubbed the stain pen on the distressed parts of the frame. I then re-sanded the stain pen areas to help make it look distressed and not like fresh stain.